Battery switch on travel trailer function is crucial for managing your RV’s power. This guide dives into how these switches work, the different types available (single, dual, rotary), and how to safely connect and disconnect your batteries. We’ll cover troubleshooting, installation, and energy-saving tips to keep your travel trailer running smoothly.
Understanding your battery switch is key to preventing electrical issues and maximizing your battery life. We’ll walk you through the process step-by-step, from basic operation to advanced troubleshooting techniques, ensuring you’re confident in managing your RV’s power system.
Understanding Battery Switch Functionality in Travel Trailers
A battery switch is a crucial component in a travel trailer’s electrical system, allowing you to manage the power flow between your trailer’s batteries and various electrical appliances. Understanding its function is key to preventing electrical issues and maximizing battery life. This section will explain the purpose of battery switches, detail different types, and provide a step-by-step guide on their operation.
Battery Switch Purposes
The primary purpose of a battery switch is to isolate or connect your trailer batteries to the trailer’s electrical system. This control is essential for several reasons. It allows you to disconnect the house batteries to prevent parasitic drain when the trailer is stored for extended periods. It also enables you to switch between different battery banks (if your system has more than one), and facilitates charging from various sources (shore power, generator, or solar).
Proper use helps extend the life of your batteries and prevents accidental discharge.
Types of Battery Switches
Several types of battery switches exist, each with its advantages and disadvantages. The most common types are single, dual, and rotary switches. Single switches simply connect or disconnect one battery bank to the trailer’s system. Dual switches allow selection between two battery banks, often used with a dedicated deep-cycle battery for house power and a starting battery for the tow vehicle.
Rotary switches offer more control, often providing options for connecting both battery banks, one battery bank, or neither.
Operating a Battery Switch
The operation of a battery switch varies slightly depending on the type, but the general principles remain the same. Before operating any switch, always ensure you understand the switch’s labeling and positions. Consult your trailer’s owner’s manual for specific instructions if needed.A typical step-by-step guide for operating a common rotary switch would be:
- Identify the different positions on the switch. Common positions include “Off,” “Battery 1,” “Battery 2,” and “Both.”
- Start with the switch in the “Off” position. This completely disconnects the batteries from the trailer’s electrical system.
- Select the desired position based on your needs. For example, to use only the house batteries, select “Battery 1”. To charge both batteries from shore power, select “Both”.
- After use, return the switch to the “Off” position to prevent parasitic drain.
Comparison of Battery Switch Types
| Feature | Single Switch | Dual Switch | Rotary Switch |
|---|---|---|---|
| Number of Battery Banks Controlled | One | Two | One or Two (depending on model) |
| Complexity | Simple | Moderate | Moderate to High |
| Cost | Low | Medium | Medium to High |
| Flexibility | Low | Medium | High |
Troubleshooting Common Battery Switch Issues
Your travel trailer’s battery switch is a critical component, ensuring you have power when you need it. Problems with this switch can leave you stranded without lights, appliances, or the ability to charge your batteries. Understanding common issues and how to troubleshoot them is key to a smooth camping experience.
Troubleshooting a faulty battery switch often involves a process of elimination. You’ll need to systematically check different parts of the system to pinpoint the exact problem. Remember safety first! Always disconnect the negative battery terminal before working on any electrical components.
Battery Switch Showing No Power
A common problem is a complete lack of power from either your house batteries or the tow vehicle battery. This could stem from several issues. First, verify that the battery switch is correctly set to the desired position (house batteries, tow vehicle battery, or both). A simple mistake here is easily overlooked. If the switch is correctly positioned and there’s still no power, check your fuses.
Blown fuses are frequently the culprit. Inspect the fuses in both the battery switch itself and your trailer’s main electrical panel. Replace any blown fuses with fuses of the same amperage rating. If fuses continue to blow, there’s a short circuit somewhere in your wiring that needs professional attention.
Understanding Blown Fuses as an Indicator
Blown fuses indicate an overload in the electrical system. This overload can be caused by a short circuit (a direct connection between the positive and negative wires), a faulty appliance drawing excessive current, or simply too many appliances running simultaneously. Identifying the source of the overload requires careful inspection of your wiring and appliances.
Common Causes of Non-Functional Battery Switch and Their Fixes
Let’s Artikel some common causes for a non-functional battery switch and their solutions. Addressing these issues promptly can prevent more significant problems and ensure your power supply remains reliable.
- Problem: The battery switch is in the wrong position.
Solution: Verify the switch is correctly set to “House,” “Tow,” or “Both,” depending on your power needs. - Problem: Blown fuse in the battery switch or main panel.
Solution: Replace the blown fuse with one of the same amperage rating. If the fuse blows again immediately, there’s a short circuit requiring professional diagnosis. - Problem: Corroded battery terminals or connections.
Solution: Clean the terminals with a wire brush and baking soda solution. Apply a corrosion inhibitor to prevent future corrosion. - Problem: Faulty battery switch itself.
Solution: Replace the battery switch. This might require some electrical knowledge or professional assistance. - Problem: Loose or damaged wiring.
Solution: Inspect all wiring connections to the battery switch and main panel. Tighten any loose connections and repair or replace any damaged wires. This often requires tracing the wires and may necessitate professional help.
Importance of Regular Battery Switch Maintenance, Battery switch on travel trailer function
Regular maintenance is crucial for preventing problems and ensuring the longevity of your battery switch. This involves periodically inspecting the switch for corrosion, loose connections, and damage. Cleaning the terminals and ensuring all connections are secure will significantly extend the life of your battery switch and prevent unexpected power outages. It’s a small effort that can prevent significant inconvenience down the road.
Consider inspecting your switch at least once a year, or more often if you frequently use your travel trailer.
Battery Switch and Electrical System Integration
Your battery switch is the central nervous system of your travel trailer’s power, connecting your house batteries to the rest of your electrical system. Understanding how it interacts with other components is key to preventing electrical issues and ensuring a smooth power supply for all your appliances. This section will explain the interplay between your battery switch and other electrical components, providing guidance on wiring and different configuration options.
So, you’re an audiophile who loves to travel? Awesome! Make sure you check out this guide on audiophile travel setup to keep your tunes sounding amazing on the go. It’s all about packing smart, not just light. And speaking of smart travel planning, don’t forget to sort out your insurance! Getting Aon travel insurance is a total no-brainer for peace of mind; you’ll be glad you did.
The battery switch acts as a master on/off switch, controlling the flow of power from your house batteries. This power then feeds into other components like your converter, inverter, and ultimately, your trailer’s appliances. The converter changes 12-volt DC power from your batteries into 120-volt AC power for things like lights and outlets. The inverter does the opposite, transforming 12-volt DC into 120-volt AC, often used for higher-power appliances.
Proper integration ensures these components receive power only when needed and prevents potential short circuits or damage.
Correct Wiring of a Battery Switch
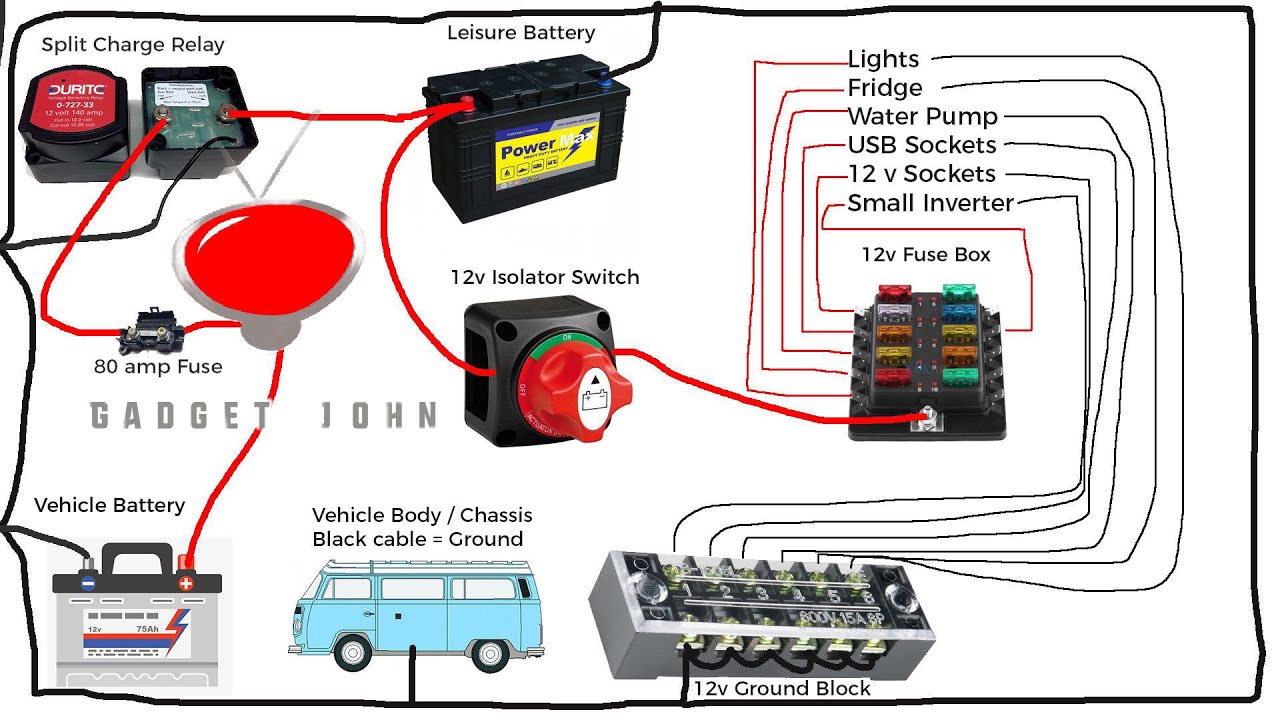
Wiring a battery switch correctly is crucial for safety and functionality. Incorrect wiring can lead to short circuits, battery damage, and even fire hazards. Generally, the positive (+) cable from your battery connects to the switch’s input terminal, and the output terminal then leads to the positive bus bar of your electrical panel. The negative (-) cable from your battery typically connects directly to the chassis of the trailer (ground) near the battery.
This setup allows the switch to control the flow of positive current to your electrical system. Always consult your specific battery switch and trailer’s wiring diagrams for precise instructions and to ensure compatibility. Never connect the negative cable through the switch; it should always be a direct ground connection.
Comparison of Battery Switch Wiring Configurations
Several wiring configurations exist, each with its own advantages and disadvantages. The simplest configuration involves a single battery switch controlling the power to the entire 12-volt system. This is suitable for smaller trailers with minimal electrical demands. More complex setups might involve multiple battery switches – one for house batteries and another for a dedicated starting battery for the tow vehicle.
This is beneficial for larger trailers or those with significant power requirements, preventing accidental drain of the starting battery. Some systems even incorporate a “combination” switch that allows you to choose between shore power, generator power, and battery power. The best configuration depends on your specific needs and the complexity of your electrical system.
Electrical Flow Diagram
| Component | Function | Connection | Diagram Note |
|---|---|---|---|
| House Batteries (12V DC) | Power Source | Positive (+) to Battery Switch Input, Negative (-) to Chassis Ground | Represented by two parallel lines (+) and (-) |
| Battery Switch | On/Off Control | Positive (+) Input from Batteries, Positive (+) Output to Converter/Inverter | Switch symbol with ON/OFF indication |
| Converter (12V DC to 120V AC) | DC to AC Conversion | Positive (+) Input from Battery Switch, Output to AC Panel | Rectangle with “12V in, 120V out” |
| Inverter (12V DC to 120V AC) | DC to AC Conversion (higher power) | Positive (+) Input from Battery Switch, Output to High-Power Outlets | Rectangle with “12V in, 120V out” |
| AC Electrical Panel | Distribution of 120V AC power | Input from Converter, Output to Appliances | Rectangle with various outlet symbols |
| Appliances (Lights, Outlets, etc.) | Power Consumers | Input from AC Panel | Various appliance symbols |
Battery Switch Selection and Installation: Battery Switch On Travel Trailer Function
Choosing and installing the right battery switch is crucial for safe and reliable power management in your travel trailer. A poorly selected or incorrectly installed switch can lead to electrical problems, potentially damaging your appliances or even creating a fire hazard. This section details the process of selecting and installing a battery switch, ensuring a secure and functional power system.Selecting the correct battery switch involves considering several key factors.
So, you’re an audiophile who loves to travel? Awesome! First things first, you’ll want to check out this guide on creating the perfect audiophile travel setup to ensure your ears are always happy on the go. And speaking of travel, don’t forget to sort out your insurance! Getting Aon travel insurance beforehand is a smart move – peace of mind is priceless, especially when you’re carrying around expensive audio gear.
The most important is the amperage rating, which must be higher than the maximum current your trailer’s electrical system will draw. Underestimating this can lead to overheating and failure of the switch. The type of switch is also important; consider a heavy-duty switch designed for the rigors of RV use, potentially with features like a built-in fuse or circuit breaker for added safety.
Finally, think about the switch’s mounting style and physical size to ensure it fits comfortably within your trailer’s electrical bay.
Battery Switch Selection Criteria
When choosing a battery switch, several factors are critical for safe and efficient operation. Amperage rating should be carefully considered, ensuring it exceeds the maximum current draw of your trailer’s electrical system. This prevents overheating and potential damage. Consider the type of switch; heavy-duty switches are recommended for RV applications due to their robustness and resistance to vibration.
Features like integrated fuses or circuit breakers enhance safety. Finally, the switch’s physical dimensions and mounting style must be compatible with your trailer’s available space and existing wiring.
Battery Switch Installation Procedure
Installing a battery switch requires careful attention to detail and adherence to safety precautions. Always disconnect the negative terminal of your battery before starting any work. This is crucial to prevent accidental shorts and electrical shocks.
- Prepare the location: Choose a suitable, easily accessible location in your trailer’s electrical bay, ensuring adequate ventilation. Clean the area thoroughly.
- Mount the switch: Securely mount the battery switch to the chosen location using appropriate hardware. Ensure a firm and level mounting to prevent vibration-induced damage.
- Connect the battery cables: Connect the positive (+) battery cable to the battery switch’s input terminal, and the negative (-) cable to the battery switch’s output terminal. Use appropriately sized cables to handle the amperage rating of the switch, and ensure all connections are tight and secure. Crimp connectors should be used for a reliable connection.
- Connect the load cables: Connect the positive (+) output cable from the switch to the main power distribution panel or fuse box in your trailer. Again, use appropriately sized wiring and ensure all connections are secure. The negative (-) output cable should be connected to the trailer’s chassis ground.
- Install fuses or circuit breakers: Install appropriately sized fuses or circuit breakers in the positive (+) cable(s) leading from the battery to the switch and/or the switch to the distribution panel. This is crucial for overcurrent protection. The fuse rating should be slightly higher than the highest anticipated current draw of the connected circuit.
- Reconnect the battery: Carefully reconnect the negative (-) battery terminal.
- Test the installation: Test the newly installed battery switch to ensure proper operation. Verify that the battery switch correctly isolates and connects the battery to the trailer’s electrical system.
Wiring and Fuse Selection
Properly sized wiring and fuses are essential for the safe operation of your battery switch. Undersized wiring can overheat and cause a fire, while undersized fuses may not protect your system from overcurrent events. The wire gauge should be selected based on the amperage rating of the battery switch and the length of the wire run, using a wire gauge chart as a guide.
For example, a 100-amp battery switch might require 4-gauge wire for short runs and potentially larger gauge wire for longer runs. The fuse or circuit breaker rating should be slightly higher than the maximum amperage rating of the switch to provide adequate protection. For example, a 100-amp switch might use a 125-amp fuse.
Testing the Battery Switch
Testing the newly installed battery switch involves verifying its ability to isolate and connect the battery to the trailer’s electrical system. With the battery switch in the “off” position, use a multimeter to check for voltage at the output terminals of the switch; there should be no voltage present. Then, switch the battery switch to the “on” position and re-check the voltage; you should now measure the battery voltage at the output terminals.
Finally, test all electrical components in your trailer to ensure they function correctly. If any issues arise, carefully review the installation steps and wiring connections. A systematic approach to troubleshooting can help identify and rectify any problems.
Battery Switch and Energy Management

Your travel trailer’s battery switch is more than just an on/off switch; it’s a key component in effectively managing your power resources. Understanding how to use it can significantly extend the life of your batteries and prevent frustrating power outages on the road. Proper battery switch usage is crucial for maximizing your off-grid time and minimizing the need for frequent recharging.Efficient energy management in a travel trailer relies heavily on the strategic use of the battery switch.
By isolating the house batteries from the trailer’s electrical system when not needed, you prevent parasitic drain – the slow but steady depletion of battery power caused by devices drawing even a small amount of current while the trailer is not in use. This is particularly important when you’re storing your trailer for extended periods or when boondocking (camping without hookups).
Conserving Battery Power with the Battery Switch
The simplest way to conserve battery power is to turn the battery switch to the “off” position when you’re not actively using the trailer’s 12-volt systems. This completely disconnects the house batteries from the electrical system, preventing any unnecessary drain. Remember to switch the battery switch back to the “on” position when you’re ready to use your lights, water pump, or other 12-volt appliances.
If your switch has a “both” or “start” position, that allows you to use your tow vehicle battery to start the trailer’s engine, if so equipped.
Optimizing Battery Life with the Battery Switch
Strategic use of the battery switch extends battery life by minimizing the time they spend under load. Consider using the switch to isolate different sections of your electrical system. For example, if you’re only using the interior lights, you might consider turning off other systems to reduce the drain. Regularly checking your battery voltage with a multimeter can help you monitor the health of your batteries and identify any potential issues early on.
Additionally, using energy-efficient appliances and avoiding leaving lights on unnecessarily significantly reduces the load on your batteries, further enhancing their lifespan. A fully charged battery, protected from excessive drain, lasts much longer than one consistently running low.
Tips for Extending Battery Life Using a Battery Switch
Proper battery maintenance is crucial, and the battery switch plays a key role. Here are some tips:
- Always turn the battery switch to the “off” position when the trailer is not in use for extended periods.
- Regularly check your battery voltage to ensure they are adequately charged.
- Use a battery tender or trickle charger to maintain a full charge during storage.
- Avoid leaving lights or other appliances on unnecessarily.
- Utilize energy-efficient appliances whenever possible.
- Consider adding a solar panel to supplement your battery charging.
- Periodically clean your battery terminals to prevent corrosion and ensure good electrical connection.
Safety Considerations
Working with batteries and electrical systems in your travel trailer, especially the battery switch, presents several potential hazards. Understanding these risks and following appropriate safety procedures is crucial to prevent injury or damage. Ignoring safety protocols can lead to serious consequences, including electric shock, burns, fires, and even explosions.Proper safety practices are non-negotiable when dealing with the electrical system of your RV.
A seemingly minor mistake can quickly escalate into a dangerous situation. This section Artikels essential safety measures to ensure your well-being and protect your investment.
Potential Hazards of Incorrect Battery Switch Usage
Incorrectly using the battery switch can lead to several dangerous situations. For example, accidentally connecting the house batteries to the vehicle’s charging system while the engine is off could drain the vehicle’s battery. Conversely, leaving the switch in the wrong position could lead to unintended discharges of your house batteries, potentially leaving you without power when you need it most.
Moreover, improper wiring or connections can create short circuits, leading to overheating, fires, and potentially explosions.
Importance of Appropriate Safety Gear
Working with batteries and electrical systems requires appropriate personal protective equipment (PPE). This includes safety glasses to protect your eyes from sparks or battery acid splashes, insulated gloves to prevent electrical shocks, and closed-toe shoes to protect your feet. It’s also advisable to wear long sleeves and pants to minimize skin exposure. Never work on electrical systems while wearing loose clothing or jewelry that could get caught in moving parts or conduct electricity.
Safety Guidelines for Preventing Electrical Shocks and Fires
Before working on any part of your travel trailer’s electrical system, always disconnect the negative terminal of the battery. This will prevent accidental shocks. Ensure the area is well-ventilated to prevent the buildup of flammable gases, especially when working near batteries. Use insulated tools to avoid direct contact with electrical components. Inspect all connections for corrosion and tightness.
Loose or corroded connections can lead to overheating and fire. Never work on electrical systems in wet or damp conditions. Water is an excellent conductor of electricity and significantly increases the risk of shock.
Emergency Procedures for Electrical Issues
It’s essential to have a plan in place in case of an electrical emergency. Knowing what to do can minimize the risk of injury and damage.
- Immediate Disconnection: If you experience a shock or see sparks, immediately disconnect the negative terminal of the battery.
- Fire Extinguisher: If a fire starts, use a fire extinguisher rated for electrical fires (Class C). Never attempt to extinguish an electrical fire with water.
- Evacuation: If the situation is beyond your control or if you are unsure how to proceed, evacuate the travel trailer immediately and call emergency services.
- Professional Assistance: For any electrical issue you are unsure about, contact a qualified RV technician or electrician. Do not attempt repairs if you are not knowledgeable in electrical systems.
Mastering your travel trailer’s battery switch is about more than just turning power on and off; it’s about understanding your RV’s electrical system, ensuring safety, and extending the life of your batteries. By following the guidelines and troubleshooting tips provided, you’ll be well-equipped to handle any power situation on the road. Happy travels!
Commonly Asked Questions
What size battery switch do I need?
The required amperage rating depends on your battery bank’s capacity. Consult your RV’s wiring diagram or a qualified electrician for the correct size.
My battery switch is making clicking noises. What’s wrong?
This often indicates a loose connection or a faulty switch. Check all connections for corrosion and tightness. If the problem persists, replace the switch.
How often should I clean my battery terminals?
Clean your battery terminals at least twice a year, or more frequently if you notice corrosion.
Can I use a battery switch to switch between shore power and batteries?
No, a battery switch only controls the flow of power from your batteries. Shore power is controlled by a separate system.
